Overview
Building a simple starter GameOn extension is simple with Code LX. For this tutorial, you will learn how to create a simple GameOn extension that prints the words “Hello World” within a small window in the GameOn In-Game Overlay.
What you’ll need:
GameOn Developer Toolkit (v200501) or later.
or any Coding IDE (we recommend Visual Studio Code)
Step One: Creating the Manifest
To begin, we need to create a project manifest. In GameOn Developer Toolkit, creating a new project will let you save it as an LX-Manifest by clicking the dropdown button in the Save-As window.
The LX Manifest will then need to include the following code:
including GameOnExt.LXCore,
including GameOn.LXCore,

public Manifest new Manifest(this.manifest)
{

}
This code will include the references: GameOnExt.LXCore and GameOn.LXCore. These references are required for the manifest.
Within the two curled brackets, you will want to define the following:
extension.Name.String
extension.Publisher.String
extension.MinVer.String
extension.VersionID.String
extension.Details.String
extension.Locale.String
These fields will help communicate to GameOn (and also to us when you submit your extension for distribution) what your application is, who made it, what version of GameOn Driver it requires to run, the version number and what language your extension runs in.
As these properties are declared as ‘.string.’ they are simply represented by a string of characters. You can therefore fill these fields in within the document by typing the equals sign (=) along with the property in quotation marks (“”), finished by a semi-colon (;). See the following example of the Extension Name and Publisher being filled out:
extension.Name.String = "My First Extension";
extension.Publisher.String = "My Name Here";
You can also use double slashes (//) to create comments. Anything on the same line that is preceded by “//” will not count as code. This can be useful as you can leave yourself notes explaining parts of the code.
So now that you have filled out your manifest properties, it should look a little bit like this:
including GameOnExt.LXCore,
including GameOn.LXCore,

public Manifest new Manifest(this.manifest)
{
    extension.Name.String  = "My First Extension";
    extension.Publisher.String  = "My Name Here";

    //the minimum possible version is 190902, when extensions were introduced
    extension.MinVer.String  = "190902";

    extension.VersionID.String  = "1.0";
    extension.Details.String  = "My really cool first extension that prints Hello World in the overlay";

    //EN-AU is the string for English-Australia
    extension.Locale.String  = "EN-AU";
}
If your extension supports multiple languages, you can declare this by opening up the string as an array.
extension.Locale.Array=
        [
            "EN-AU",
            "EN-US",
            "EN-GB",
            "EN-INTL"
        ];
It is important to note however that as long as one major English denomination is supplied (US,GB,AU or INTL), the application will count all other English languages. We included all of them just to show you how to add multiple languages.
Now that we have the manifest filled out, we must declare all dependencies required by the extension. This includes all files so you will need to collate them all. At the beginning of every code file you have you will have “including Dependency.Here” to let you know what you need to put here.
extension.Dependencies(set)
    {
        [
             GameOnOverlayObject;
             GameOnExt;
             GameOn;
        ]
    }
We are adding GameOn and GameOnExt as these are dependencies we used just here in the manifest. You may note that in our manifest we declared “GameOn.LXCore” and not “GameOn”. To simplify things, we will just include the “parent” which is GameOn, which will automatically include all “children” such as “LXCore”.
All of these steps should bring us to our completed manifest. Which should look something a little like:
including GameOnExt.LXCore,
including GameOn.LXCore,

public Manifest new Manifest(this.manifest)
{
    extension.Name.String  = "My First Extension";
    extension.Publisher.String  = "My Name Here";

    //the minimum possible version is 190902, when extensions were introduced
    extension.MinVer.String  = "190902";

    extension.VersionID.String  = "1.0";
    extension.Details.String  = "My really cool first extension that prints Hello World in the overlay";

    //EN-AU is the string for English-Australia
    extension.Locale.String  = "EN-AU";
}
extension.Dependencies(set)
{
   [
      GameOnOverlayObject;
      GameOnExt;
      GameOn;
   ]
}
And with that, we can move on to Step Two.
Step Two: Programming our Extension
It may feel like we’ve already written some code, but really we’ve defined simple properties such as who we are, what the extension is called and what languages it supports. Make sure that you have saved your manifest, and then click “New Project” under the “File” menu in GameOn Developer Toolkit (or create your new file in another IDE).
You will want to save this file with a name that makes sense to you. Something like “extension”. It should also be in the file format “.clx”, though “.lxc” files are supported also.
We will start by declaring our dependencies and linking our manifest to the extension. To do this, we will want to type the following code:
including GameOnExt,
including GameOn,
including GameOnOverlayObject,

public SolutionManifest new SolutionManifest(GameOnExtension)
{
    //Define extension manifest
    manifest.string="/manifest.lxmanifest";

    //Initialise manifest.
    new Manifest(manifest)
}
Note: If you’re putting your extension file in a different folder to your manifest, you will want to include the folder path in the manifest.string field.
Now that we have told our extension where our manifest is and initialised it, we will want to program our extension and give it some functions. This is very easy since all we are doing is printing some text. You will want to add the following to your code:
public ExtensionData new ExtensionData(GameOnExtension)
{
    //Initialise extension
    new GameOnOverlayObject(MyFirstExtensionWooHoo)
    {
        OverlayExtensionsRegion.create(new(extensionaccesspoint))
        {
            icon.visibility="visible";         //visible for icon, hidden for text button
            icon.set="/icon.png";              //icon for the button
            alttitle.set="Click Me!";          //hover over tooltip text for button

            //create an activity on button press
            button.activity(new activity)
            {
                new GameOnOverlay.Window(MyWindow)
                {
                    //Print the text "Hello World"
                    new TextLabel = TextLabel1();
                    TextLabel1.Text.String = "Hello World";
                }
            }

            if GameOnOverlay.Suspended(true){
                GameOnExtension.State="paused";
            }
        }
    }
This code may look a little intimidating, however it is quite easy to break down as Code LX is a human-readable language.
public ExtensionData new ExtensionData(GameOnExtension)
{
    //Initialise extension
    new GameOnOverlayObject(MyFirstExtensionWooHoo)
    {
        OverlayExtensionsRegion.create(new(extensionaccesspoint))
        {
This code simply initialises your extension and creates a new access point for your extension. The access point is where users will interact with your extension. In this case, we created it in the OverlayExtensionsRegion. This is a window that appears in the In-Game Overlay that includes extension icons that can be pressed, executing code. That’s what we want!
            {
            icon.visibility="visible";         //visible for icon, hidden for text button
            icon.set="/icon.png";              //icon for the button
            alttitle.set="Click Me!";          //hover over tooltip text for button

            //create an activity on button press
            button.activity(new activity)
            {
                new GameOnOverlay.Window(MyWindow)
                {
                    //Print the text "Hello World"
                    new TextLabel = TextLabel1();
                    TextLabel1.Text.String = "Hello World";
                }
            }
The code printed above simply defines some properties. Whether you want the button to be an icon or just a text button, which icon you’d like to use, and text to appear when you hover over the button. You will want to decide these yourself and put an icon in your project folder called “icon.png”. We then create an activity on the press of the button.
The button.activity is created. It creates a “new GameOnOverlay.Window” called “(My Window)” and opens a new set of curly brackets. Within these new brackets, we can give the code for what happens within this new GameOnOverlay Window.
Since we want to print the text “Hello World” it is as simple as creating a new TextLabel and setting the TextLabel.Text.String to “Hello World”.
Now, we can open GameOn Driver for Developers and use the Extension Builder feature (this will be coming to GameOn Developer Toolkit in the future – so look out for something like ‘Build for Publishing and Distribution’. Select your project folder and test it out inside of GameOn.
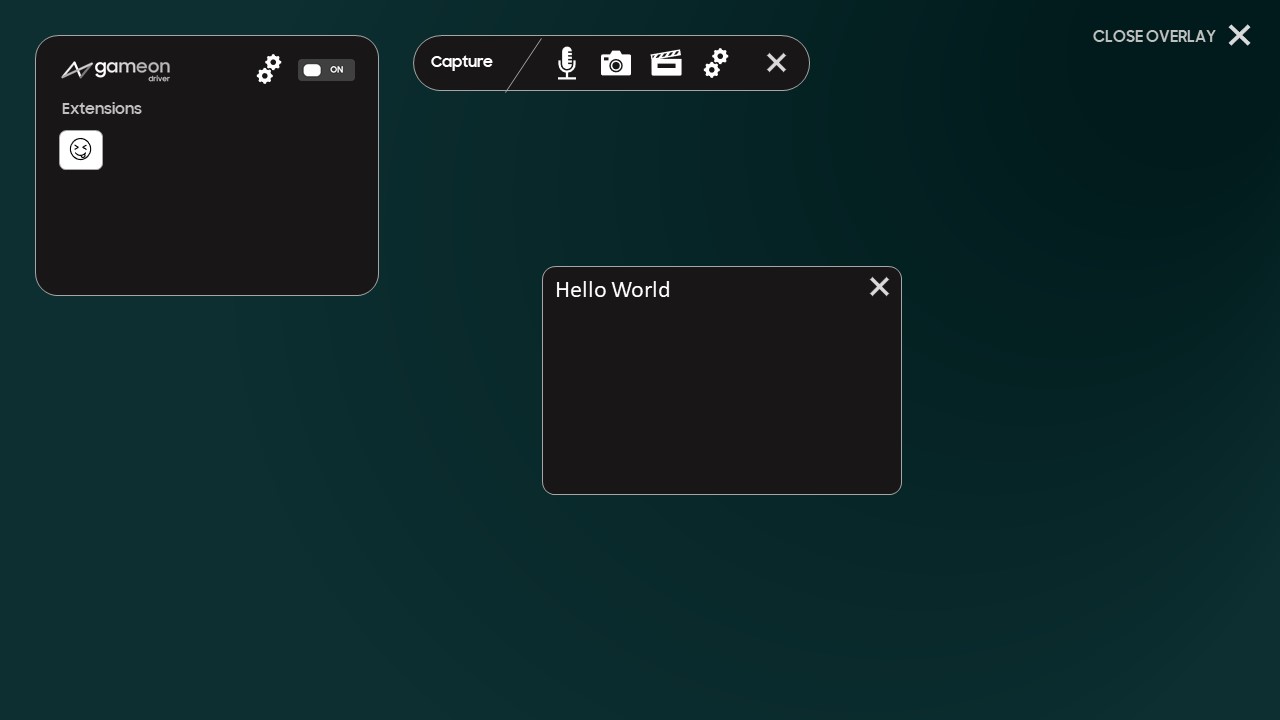
And that’s everything you need to create your first ever GameOn Extension. Well done!
Step Three: Publishing and Distribution
To publish and distribute your extension to the GameOn Extensions Library, visit the GameOn Dashboard for Developers at http://dashboard.gameondriver.com/