FieldMate QR Creation Wizard can be used to upload files to a server in order to generate QR Codes and Links to these files which can then be distributed to employees. It was originally built to distribute important PDF files to employees without the need to email files which was time consuming for staff and inefficient as emails with large attachments would often not be sent immediately.
This software can, however, be used to upload any file to a server. This could be download QR codes to an executable, a PDF or any other file type. There are a few things you will need:
- A hosted (public) website with an FTP service on your account.
- An FTP username and password
- You can usually get this as well as generate new usernames and passwords from your hosted website control panel.
- The URL where your files would be publicly available if they were uploaded to your FTP. For example, if you website is “example.com” and the FTP files upload to the “root directory” your uploaded PDF file would be uploaded as “example.com/uploadedfile.pdf”
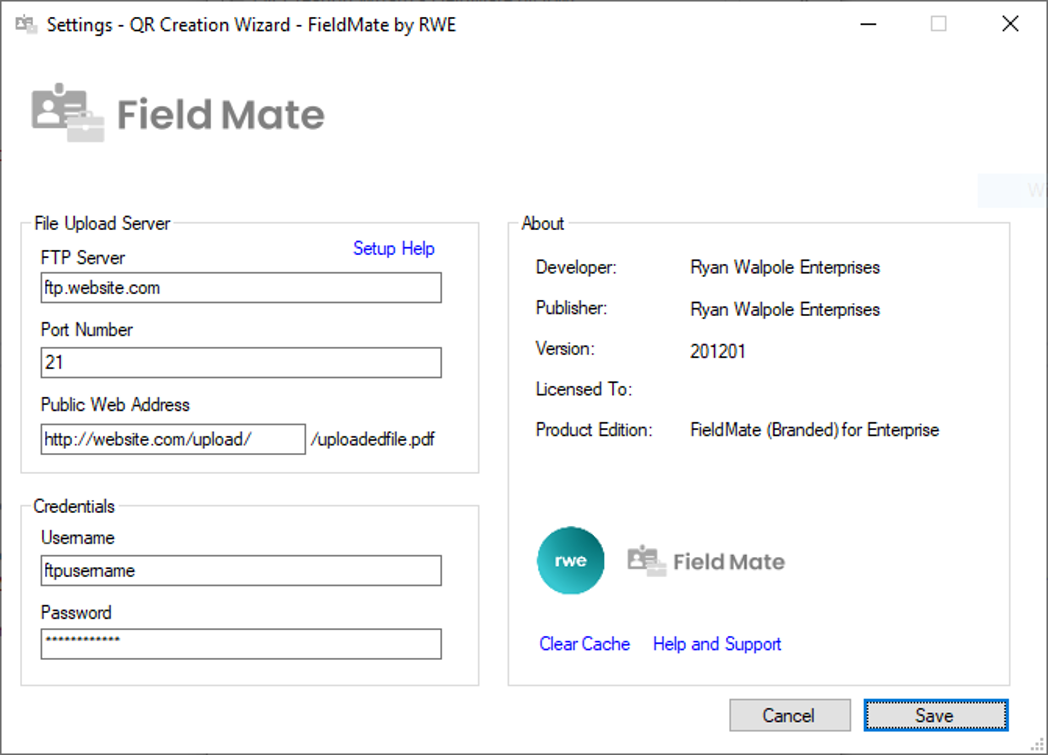
| Field | Explanation | Example(s) |
| FTP Server | This is your FTP server URL. It will usually be something like “ftp.yourwebsite.com” but some web hosts will often have a generic ftp domain that doesn’t resemble your domain. Do not include “http”,”https” or “ftp” protocols before the URL. | ftp.examplewebsite.com |
| Port Number | To connect to an FTP server, you will need to define the port number. This can technically be any number – so it’s best to check your web hosting control panel where there should be instructions for using your FTP service. If you can’t find a port number, try 21 – it’s the most common for FTP servers. | 21 |
| Public Web Address | This is where your files will be publicly available. You can usually define a location when creating an FTP account on your host. We recommend something like “/uploads” rather than using your root directory. You can include a trailing slash – or leave it out. | http://website.com/upload https://website.com/upload https://website.com/upload/ |
| Username | This is your FTP account username. It can be as simple as a word or it can be formatted like an email address | ftpusername ftpusername@mysite.com ftpusername@ftp.mysite.com |
| Password | This is your FTP account password. You will set this manually or your web host will generate one during the account generation process. You can change it using your hosting control panel if you have forgotten it. | MyVerySecurePassword |
I’m having trouble finding my FTP settings.
If you’re having problems finding out how to create an FTP account for your hosting plan, we’d recommend googling the name of your web host (e.g. Netfronts, GoDaddy, Domain.com) followed by “Create an FTP account”. Most hosting platforms will have tutorials posted that will guide you through their unique process for setting up and managing FTP accounts.
I’m not sure what my public web address is
When you create an FTP account, you will often provide a directory where the ftp account has access to. For example, I might create an FTP account for my friend to upload files to my hosting for me to download later. I might provide the directory:
public_html/myfriendsfiles/
or with some hosts:
myfriendsfiles/
Public_HTML is the root directory – files uploaded here can be accessed by going to your website and typing /filename.pdf directly after it. Since we’ve selected Public_HTML/myfriendsfiles, this means it can be accessed by going to your website and typing /myfriendsfiles/filename.pdf.
We recommend creating an account with the directory set to
public_html/uploads/
So if your website is “example.com” a PDF file called “filename” will be publicly available from “example.com/uploads/filename.pdf”
Your public web address would therefore be:
With SSL:     https://example.com/uploads/
No SSL:       http://example.com/uploads/